

More information about texturing can be found in our Texturing guides category.
This guide includes pictures of a shotgun model in ZModeler 3 to explain the purpose of the texture maps. All textures used for that model were created in Photoshop. Please note that the real time rendering in ZModeler can not be compared to GTA V. In GTA, the look of the model, in particular the specular texture, highly depends on the shaders used for the model.
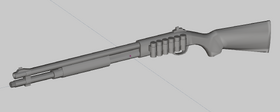
The model has a low to medium polygon count (~ 1100 triangles) and relies on textures for many smaller details. This first picture shows the model without any textures.
Diffuse Map

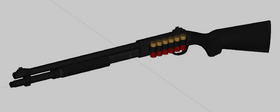
Diffuse textures (often abbreviated "diff" and also referred to as detail or color maps) are the main texture for most models, they are used to set the color of the model and add shapes or details such as texts.
Creating your own diffuse maps
Creating your own texture with image editing tools
The most basic and usually simplest way to create textures is using image editing tools such as Gimp, Paint.NET or Photoshop to add colors and details manually.
Creating your texture using photos
Some developers also use photos of real items as textures. Depending on the quality of the photo, it is possible to achieve reasonable results, however it is not recommended. Photos often distort colors depending on the lighting of the photo. Additionally, they sometimes include shine, reflections or other light effects, which should be avoided in order to achieve better looking light effects in-game.
Baking textures
Experienced 3D artists often use a process that's called baking to create their textures. This is done by creating a model with a very high detail level, including colors and shaders to create shine and reflections. By using rendering tools, it is possible to use such a model to automatically create a diffuse map with realistic shadows and light effects.
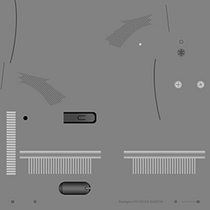
Specular Map


Specular maps ("spec") are used to set how shiny or reflective a part is supposed to be. Typically, specular textures are black and white, dark colors have very little specularity, light colors more. The specific effect of specular textures depends on the shader used. For the most common materials, in particular the mesh shader, each separate RGB channel has a different effect:
- Red: Affects the overall shine of an object. Without any shine (R = 0), the other colors have no effect.
- Green: Roughness of reflections, ranging from a very dull (B = 0) to a very polished (B = 255) material. With low green values, high red values will make the diffuse appear brighter, very low values (in particular G = 0) additionally cause harsh shadows.
- Blue: Strength of environment reflections. Very little effect with high roughness and low shine.
Colors should not be set to 0, otherwise the material will not react to light at all. Plastic or metal parts tend to have a medium amount of red (usually between around 60 to 150) and a medium to high amount of green and blue (often between 120 and 250). Matte plastic or rubber objects usually have a higher amount of red and a lower amount of blue (often between 50 and 100). For chrome parts, full white or very light grey is usually used together with a dark grey diffuse texture.
Creating specular maps
The process of creating specular maps often includes a lot of trial-and-error to test different colors in-game and see if it looks as intended. There are no generators for specular maps, they are typically created by adjusting the colors of the diffuse texture with an image editing tool.
Normal Map


Normal maps are a specific type of bump maps. Bump maps are textures used in many video games to add small details that seem three-dimensional. They are used specifically to add details to mostly flat surfaces without the need to model such details. The performance impact of using normal maps is much lower than when using modeled details, they should therefore always be used if reasonably possible.
Normal maps do not change the actual 3d object. When using a normal map on a flat object, the object will still appear flat when looking at it from the side. When looking at it from the top, the game engine will create reflections and shadow effects based on the normal map, creating the illusion of having three-dimensional details.
Creating normal maps
Creating normal maps from scratch is possible in theory, but it is not recommended. Instead, there are different types of normal map generators available, using height maps or 3d models to render normal maps.
Generating normal maps from a height map
Height maps are greyscale textures indicating the height of specific parts on a texture. Darker areas are lower, lighter areas higher.
To create a normal map out of the height map, a normal map generator needs to be used. Current versions of Photoshop include one by default, third party plugins are available for Gimp or Paint.NET.
Baking textures
Like diffuse maps, normal maps can also be baked. Instead of a height map, the normal map generator uses the height of a 3d object to generate the normal map. Such a generator is commonly included with 3d modeling applications, such as 3ds Max or ZModeler 3.
Authors
-
Cj24
AdministratorAccurate Studio
Participate now!
Don’t have an account yet? Register yourself now and be a part of our community!
Comments 1