

After downloading a car mod, in the most cases you'll receive an archive including all required files. After unpacking said archive, there're usually model and texture files and sometimes also configuration files or instructions to edit configuration files. This guide will cover the installation process of all of these files.
Some mods may provide an OpenIV Installation package that installs a vehicle with a few clicks or a complete DLC file to be added to the game. Either of those options are usually very simple and well explained and are therefore not covered in this guide.
Installation instructions for the specific downloaded car can normally be found in a readme file included with the mod. However, they are often not as detailed as this guide.
Models and textures
The most important part of all vehicle mods are the model and texture files. They will always be included with any vehicle mod. They are installed using OpenIV, as mentioned in our guide Tools Needed to Install Mods.
What files are needed?
- name.yft (model file)
- name.ytd (texture file)
- name_hi.yft (high quality model file)
- name+hi.ytd (optional high quality texture file)
The name of the files will determine what car is going to be replaced. To replace a different car, simply change the name.
Where do I install them?
In many cases, the readme file will already suggest a place to install the model and texture files. If not, or if the suggested location did not work, the following approach is commonly used:
Considering some game updates include updated cars, the best choice to install vehicles is in the vehicles.rpf of the latest patchday archive. The game will prioritize the most current patches if files with the same name are in different locations.
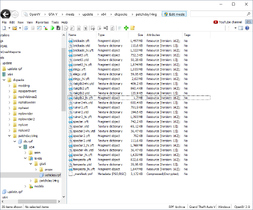
The archives can be found in \update\x64\dlcpacks\, the vehicles.rpf inside the archive in dlc.rpf\x64\levels\gta5\.
Installing model and texture files
The .ytd and .yft files can either be dragged from Windows Explorer and dropped into the archive, they'll automatically replace existing files with the same name. Alternatively, the Edit > Add button in the menu bar can be used to add new files and the Edit > Replace button can be used to replace a previously selected file.
Additional configuration files
Most cars will either include edited configuration files that have to be put into the right location in OpenIV (this process is the same as with .ytd and .yft files) or the lines for their car only that need to be added to one of the existing files. In the following sections, the guide will explain how to put custom lines into the existing files.
Like with model and texture files, the readme file of most mods will provide suggested locations. As the patchday archive that can be used for .yft and .ytd files doesn't usually support configuration files, the latest DLC is usually a good choice.
To edit a configuration file, export it and open it with a plain text editor of your choice (see Tools Needed to Install Mods for more information). When it's finished, replace the original file with the edited version.

vehicles.meta
The vehicles.meta for all default vehicles can be found in \update\update.rpf\common\data\levels\gta5, please note that any edits to default vehicles must be done in this file. Add-on vehicles can be added to vehicles.meta files in the update.rpf or in DLC archives. The vehicles.meta in DLCs can be found in the \update\x64\dlcpacks\ folder. It will be located in dlc.rpf\common\data\levels\gta5.
The vehicles.meta includes two different parts. The first containing vehicle configuration and the second containing texture relationships. The first part allows to customize the settings of a car, the second part is optional and allows to use generic game texture with specific cars.
Vehicle Configuration
Each car will have one block surrounded with <item> and </item> inside <InitDatas> and </InitDatas>. Custom lines can be added before the line containing </InitDatas>.
To replace a different car than the one intended in the original configuration, change the following values:
- Between <modelName> and </modelName> and between <txdName> and </txdName> with the name of the .yft and the .ytd file
- Between <handlingId> and </handlingId> with the name of the car in the handling.meta (see below)
- Between <gameName> and </gameName> with the name of the car according to the language file
Texture Relationships
Texture relationships are used to allow a car to use specific generic .ytd files provided by the game by default. Trucks for example often include the vehshare_truck.ytd.
They are surrounded with <item> and </item> and are inside <txdRelationships> and </txdRelationships>. Custom lines can be added before the line containing </txdRelationships>.
To replace a different car than the one intended in the original configuration, change the value between <child> and </child> to the name of the car you want to replace it with.
carvariations.meta
carvariations.meta files can be found in many DLC archives in the \update\x64\dlcpacks\ folder. They will be located in dlc.rpf\common\data\.
Each car will have one block surrounded with <item> and </item> inside <variationData> and </variationData>. Custom lines can be added before the line containing </variationData>.
To replace a different car than the one intended in the original configuration, change the value between <modelName> and </modelName> to the name of the car you want to replace it with.
handling.meta
handling.meta files can be found in many DLC archives in the \update\x64\dlcpacks\ folder. It will be located in dlc.rpf\common\data\.
Each car will have one block surrounded with <Item type="CHandlingData"> and </Item> inside <HandlingData> and </HandlingData>. There might also be a second block with <Item type="CVehicleWeaponHandlingData"> that does not include handling settings, but settings for vehicle mounted guns.
Custom lines can be added before the line containing </HandlingData>.
To replace a different car than the one intended in the original configuration, change the value between <handlingName> and </handlingName> to the name of the car you want to replace it with.
Authors
-

Cj24
AdministratorAccurate Studio

Participate now!
Don’t have an account yet? Register yourself now and be a part of our community!