Posts by Cj24

    Update 1.1 is released, the lightbar glass and the grill light emissives weren't mapped properly, this would have only been noticed when using red and blue light textures.

    I've made a small pack with changed emissive and glass colors for the lightbar. Included are all red, all blue and red/blue lights and glass textures as well as a clear glass texture. If you release any skins for the Ram, feel free to include those textures.

    I have a few new screenshots, the textures for the lightbar are now complete and I've added an interior console. I've decided not to add the back rack, I'd simply rather work on other things at the moment, I might decide to model one at a later point and release an update after the release.

    Apart from a few texture adjustments for the siren controller, the interior equipment is done:


    Regarding the lightbar, I have good news for some of you: It will be released. It is going to take some more time though, I'd like to use it for another project first. Here're some more pictures, it should be final now:

    Download:

    Old ELS version:


    My current project is an LAFD Utility Ram 2500, using the base model by Kane104. It is inspired by these trucks used by the LAFD. It's not going to be an exact replica, the light pattern for example is more like the LAFD ambulances, other differences are because I'd like to finish this quickly to move on to other projects.

    Some of you might remember the first pictures I posted when I started working on it last year. The RX2700 is a completely new model, all created from scratch, including custom textures. It has been in progress for almost a year, but I managed to complete the model only recently, thanks to reference images and feedback from Kane104 and OfficerFive0. There's still some work left on the lightbar, mostly the texture for the circuit board and a few minor things. An interior console is still in progress and I'll most likely also add a rear rack like the one the real car has.

    To clarify, my Better License Plates mods don't require any carcols modifications, they use the same colors like the default plates. Apart from the retro version with generic expiration stickers, they include modern stickers.

    Lundy's mod includes a custom version of my mod specificly made for his cars, with expiration stickers for 1984/85 and older local and state exempt plates. Other license plate textures are not compatible with Lundy's carcols.

    DLS/non-ELS version:

    Cj24
    February 13, 2021 at 7:03 PM


    ELS version (not recommended, outdated):


    ________________________


    I've been working on a smaller project to get back into modding after quite some time, an unmarked LSPD Dodge Charger. It's based on the unmarked Chargers used by LAPD's Metro Division. It's equipped with an FS Spectralux ILS interior lightbar, a CN SignalMaster traffic advisor and Micropulse LEDs.

    External Content www.youtube.com
    Content embedded from external sources will not be displayed without your consent.

    We've installed updates earlier today which have introduced many changes. The most important changes are:

    • A new design with a light and a dark mode. You can switch the styles using the sun/moon icon on the top right corner on desktop or using the menu on mobile devices.
    • YouTube videos can now be posted in our gallery. Note: This feature has been removed, as it was not used by our members.
    • It's now possible to upload a cover photo in your profiles.

    On top of that, we've made improvements to many minor parts of the website. Most noticeable are an improved filebase landing page and a new page for guides.

    If you notice any issues, please post them in our website category. Alternatively, you can also contact us on our Discord server.

    I've finally gotten around to test it myself, here's what I could figure out:

    • Strong glass (ID 122) without any added flags makes the glass break more slowly, but bullets still go through. The same applies when FLAG_HAS_BULLETPROOF_GLASS is used.
    • Strong glass with FLAG_HAS_BULLET_RESISTANT_GLASS adds the changed bullet hole texture and seems to make the glass completely bulletproof. As far as I know in GTA Online it's supposed to break after a specific amount of shots, but I'm not sure if that just doesn't work in Singleplayer or if I'm using a mod that causes this.
    • Bulletproof glass (ID 123) is always completely bulletproof and always shows the default bullet hole texture, no matter what flag is used.

    I'd therefore recommend trying ID 122 with FLAG_HAS_BULLET_RESISTANT_GLASS and see if it works the way you want it to.

    I've moved your post into your other thread, the issue still seems to be the same one.

    I haven't checked it ingame, but I've taken a quick look at your z3d and noticed the most likely cause for your issue: You've set the ID for the side windows in object mode, however it's necessary to set it in polygon mode while all of the collision's polygons are selected. The ID in Object mode is always supposed to be 0 as far as I know. The ID of the polygons is currently still set to 120 for the side windows and 122 for the windshield, that's probably why the windshield is the only glass that's bulletproof.

    The ID is set in ZModeler. You need to select the collision in Polygon mode and set the ID in Properties > General > External State. Recent versions of ZModeler (3.1.5+) also support selecting IDs and attributes from a list:

    Most default armored cars seem to use CAR_GLASS_STRONG (ID 122) however, rather than bulletproof glass. They also have the flag FLAG_HAS_BULLET_RESISTANT_GLASS in the vehicles.meta, but I'm not sure if it's necessary to add it as well, the armored Kuruma for example doesn't have that flag.

    That's most likely caused by one of GTA's quirks: Glass materials will hide emissive materials if they aren't loaded before the glass materials. To test whether this happens, you can destroy the windshield in-game. To fix it, open ZMod's materials window and make sure that the emissive material (should be named els_emissive if you haven't changed anything) is in front of the glass materials. The easiest way to do this is drag the emissive material all the way to the top, while glass materials (named vehicle_generic_glasswindows2 by default, although some authors might use different textures) should be at the bottom.

    Hello,

    For the basics of working on mods for V with ZMod 3, I recommend taking a look at our guide ZModeler 3 and Vehicle Mods.

    I'd suspect that your issues are caused by an incorrect hierachy setup. In your specific example with the front light only, the hierachy could look like this:

    [...]

    - chassis

    -- misc_c (your current "cuda" compound)

    --- misc_m ("bottommount")

    --- misc_v ("visor")

    --- extra_1

    --- extra_2

    [...]


    However, I'm not completely sure what could cause your issue with the extras, could you elaborate and post screenshots of the problem?

    That sounds like the door's collision covers the glass as well. Typically, the door collision is meant to cover the body only, while the glass has its own seperate collision model for the upper part of the door.

    Regarding the other issue with the bullet holes, I'd recommend to copy all collision settings from a similar default car. In this case, since it seems to affect the doors, you should check especially the chassis, the chassis_lowlod and the door collisions. If it still doesn't work, you could also try replacing all collision models with those of a default car.

    It's released now!


    Further equipment is going to be added in a future update when it'll be finished. However, it's likely that I'm going to work on different projects first, therefore it might take some time until I'll get back to the Caprice equipment.

    I finally have some news. I've added Kane104's new console and radio and made a siren controller and a Motorola MW810 laptop. The MW810 was in use by the LAPD in their Chargers, so it's probably a better choice than the old Dell Latitude D610 we used in the other LSPD Caprices.


    All that's left to be done are LODs for the interior equipment and some other minor tweaks, if I don't find any other issues, it will be released within the next weeks. Unlike originally planned, there is not going to be any other equipment, because those parts are still in progress and I don't want to delay the release even further to work on some other projects instead. Depending on how many people want me to, I might add the partition, spotlights and radars as extras in an update as soon as everything is complete.

    First: If the polygons are seperated in the original model, it will not work no matter how you import it.


    The two videos you have linked are not available. I don't know what the model looks like, but I'll try to explain it in a way that should work with most objects.

    There is a way to weld each side automatically. Without seeing the model, I can't guarantee it will work, but it should be possible. First, I recommend to activate wireframe and outline in your viewpoint settings if they aren't already, this way you can see where polygons are seperated and where they are connected. To weld automatically, activate the option "Multiple Targets" and select all vertices you want to weld. Before doing that, I recommend to detach all parts of the object that are actually supposed to be seperated, since otherwise the UV map and the normals could get messed up.

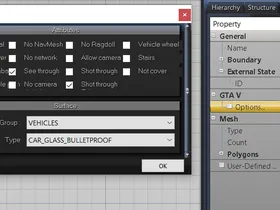
    Left click to open the tool's options and change the settings the following way. As soon as you update one of the values, ZModeler previews the change. That way with the outline option set in the viewpoint, you should be able to see if it works.

    • Vertices Distance: Since the vertices should be in the same spot, a very low disntance should be set. Depending on the detail level of the model, something like 0.001 or 0.0005 should probably work.
    • UV tolerance: If the object is continously mapped, what I imagine it most likely is, you can keep the default value. If it is not, you'll need to increase the number as much as necessary. Please note that in that case, the original UV map will be changed and it is likely necessary to create a new one.
    • Normals Angle: This is the important option to weld each side seperately instead of welding everything together. If one side is flipped, the normals should consequently also be flipped. You'll therefore need an angle below 180°. If the normals are not correctly flipped, you'll need to calculate them first.

    If it all worked, you should be able to select each side using the "Seperated" selection tool.