

Emergency Lights: Rotator Lightbars and Wig-Wags
-
Smanbg -
October 6, 2021 at 9:12 AM -
22,063 Views -
2 Comments
Rotator Lightbar
“Rotator” or “Rotor” lightbars are lightbars that utilize a motorized mechanism to rotate reflective modules around a source of light, which in often cases is Halogen. Examples of such lightbars are the Code 3 MX7000 or the Federal Signal StreetHawk.
In comparison to your traditional strobe or LED lightbar with flashing lights, rotating lights require quite a different approach when using them, in particular, the sirens have to be covered, rather than scaled down. This guide is going to walk through the two common methods for rotator lightbars.
Basics
We are going to explore the basics of the mechanic that GTA V employs with rotor lightbars.
First and foremost, the rotating modules have to be attached to the emissives, as that is what forms the siren - a rotating module and the emissive itself, and lastly - reset the local axis. After that is done, set your lightbar up as you would any lightbar, this also applies to any modules that are not rotatable.
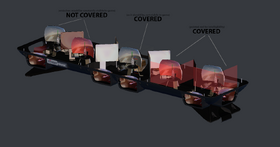
The next step on the list is covering the emissives. The rotator lightbar is a constant-spinning bar that relies on the rotation section of your siren in the carcols, which is also why it cannot be scaled and why the emissives should be covered when the lights are not on.
Carcols
Once you have your rotor set up, you are going to pay special attention to the carcols.meta. If you are not familiar with setting up sirensettings in the carcols.meta, please review our Setting Up Emergency Lights guide.
As previously mentioned, it relies on the rotation part of the carcols. The rotate value must be set to true. By default, the sequencer value of 4294967295 should be added under rotation. This is the binary of a constant 32-bit sequence (11111111111111111111111111111111). Rotate must be set to true to enable rotators, whereas scale and flash should be set to false for a constant light.
Slower rotators
It is possible to decrease the speed of rotators without decreasing the BPM by adjusting the speed value and the sequencers. In the rotation settings, syncToBpm must be turned off to be able to adjust the speed value. The exact speed value required depends on your BPM and the sequencer. Examples:
- Sequencer: 10101010101010101010101010101010 (2863311530) - Speed value: BPM value / 100 * 8
- Sequencer: 10001000100010001000100010001000 (2290649224) - Speed value: BPM value / 100 * 4
- Sequencer: 10000000100000001000000010000000 (2155905152) - Speed value: BPM value / 100 * 2
- Sequencer: 10000000000000001000000000000000 (2147516416) - Speed value: BPM value / 100
To calculate the speed value and to find example sequencers for different speeds, our Speed Value Calculator can be used. Note that the sequencers listed here in and the calculator are the most common examples, shifting the starting position is possible as long as the spacing of 1s and 0s is kept the same.
Hiding emissives
To prevent the emissives from being visible when the lights are off, they must be hidden. There are multiple methods of hiding and un-hiding the emissives.
Method #1 - Extra
This method explores the use of a vehicle extra slot to cover the sirens of the lightbar.
First and foremost, create a new material with a transparent diffuse texture and move it above the emissive material in the materials browser. Next, cover the entirety of the rotating modules, which could be done by simply making a box (with the box tool) that covers the entire trajectory of the rotating module. Apply that to all rotating modules and assign the transparent material to them.
Once that is done, simply set the boxes up as a regular extra. Nothing else is required.
The major flaw of this method is that one has to manually turn the extra on and off when they want to have the rotor rotate, or by using a script such as ELS.
Method #2 - Siren
This method explores the use of a siren to cover the rotors of the lightbar.
First and foremost, create a new material with a transparent diffuse texture and move it above the emissive material in the materials browser. Next, cover the entirety of the rotating modules, which could be done by simply making a box (with the box tool) that covers the entire trajectory of the rotating module. Apply that to all rotating modules and assign the transparent material to them.
Once that is done, create a copy and convert it to a dummy. Scale the dummy down to 0.0150 on the dummy’s X, Y, and Z-axis, and move it a tad down (towards the inside of the lightbar). Once the dummy is concealed inside of the lightbar, put the boxes in the dummy (in the hierarchy), reset the axis to parent, complete it as a regular siren (compounding and naming), and export your project.
The next steps are going to take place in the carcols, as the following values have to be changed, only for the siren used by the covers:
- <rotate value> = false
- <flash value> = true
- <scale value> = true
- <scaleFactor value> = 0.01
- <light value> = false
To elaborate on the subject, this utilizes a regular siren setup for the covers of the rotors, however, it scales it down inversely, thus hiding it when the lights are activated.
Method #3 - "Sirenless" (Recommended)
While this method still utilizes sirens, it does not require any additional sirens on top of the ones utilized by the rotors themselves. As opposed to Method #2, this method does not require the rotors to be covered.
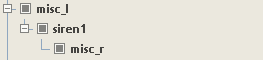
When setting up your rotors lightbar, instead of merging the rotor emissive and the rotor module, leave them separated and configure your sirens as you would normally — create the dummy, conceal it well (keep in mind that this is the origin of the light), and scale your emissive.
After you have set up your siren, set up the individual rotor module used by said siren as a misc and put it in the hierarchy of the siren itself. It will inherit the rotation properties of the siren, without getting scaled when you apply the carcols.
The next steps are going to take place in the carcols, as the following values have to be changed, only for the sirens utilizing the rotary function:
- <flash value> = true
- <scale value> = true
- <scaleFactor value>: dependent on the scaling of your siren
Wig-Wags
“Wig-Wags” is the alternation of the flashing of the driver-side and the passenger-side headlights when the emergency lights are activated. As such headlights are often halogen lights, wigwags tend to have a smooth fading transition from off to fully-lit.

Basics
The mechanic that this guide introduces is the use of a sole siren dummy to create a flashing corona to achieve the aforementioned “smooth transition” effect.
Just simply create a dummy helper and position it at the location where you want the light to be emitted from and leave it in the open. There is no need to scale it, however, it should be named as a siren and preferably compounded as Default. The remainder of the work is done through the carcols, which will be explained in the next section.
Carcols
The corona must be visible, therefore intensity and size values must be larger than 0, typically intensity should be around 50 and size around 1-2. The pull value should be as low as possible, but not too low to prevent the corona from being visible from the front.
To decrease the speed of the flashing corona, syncToBpm must be disabled and the sequencer and speed values must be set up as described in the Slower rotators section above, except adjusting the values in the flashiness settings rather than rotation.
Authors
-

Smanbg
Moderator -

Cj24
AdministratorAccurate Studio -

PNWParksFan
Developer

Participate now!
Don’t have an account yet? Register yourself now and be a part of our community!
Comments 2