

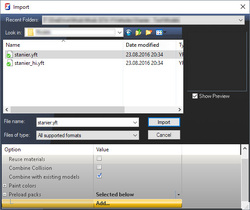
Importing a car
To import a car, press File > Import. Select one of the car's .yft files.
Textures
The first step is to make sure that all required textures are loaded. Models have at least one texture archive (.ytd files). Additionally, all cars use shared textures from the vehshare files located in GTA V\x64e.rpf\levels\gta5\vehicles.rpf which can be exported using OpenIV. Depending on the car, multiple vehshare texture archives may be used. Some cars also share interior textures found in the same archive named vehicle_name_interior.
Select a value for the option Preload Packs. If all .ytd files are in the same folder as the .yft files, select All *.ytd in current folder. If they are located elsewhere, select one of the other two options and specify their location.
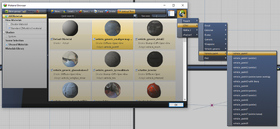
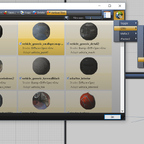
Alternatively, instead of preloading .ytd files, seperate texture files such as .png or .dds images or complete .ytd archives can also be added in the texture browser. This has to be done before importing a model.
Information about creating and editing of textures can be found in our Texturing guide category.
Models
Any car from the default game can be imported in ZModeler 3. Mods by other authors can only be imported if the author hasn't locked the model to prevent edits.
There are options than can be activated:
- Slice to parts: For GTA V, this should always be activated.
- Reuse materials: If multiple materials with the same name and shader are provided, they will be merged into one.
- Combine Collision: If collision parts already exist, they will be merged with newly imported ones.
- Combine with existing models: This option combines the hierachy of two models. It has to be activated for example when importing a car with two .yft files.
If any errors messages such as Failed to locate texture are showing during import, the texture with the provided name was not added, a placeholder texture will be used instead. This placeholder texture can be replaced with the correct texture in the texture browser.
Adding a second model file
Models usually include more than one .yft file. In almost every case, there is also a _hi.yft file containing a highly detailed LOD (LODs are explained below). Import the second .yft file after the first one, including all textures, has been imported.
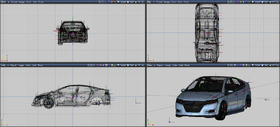
A first look at the car and ZModeler
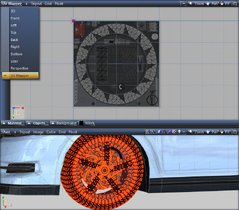
At first, click on the L0 button in the Structure tab of the scene nodes browser to view a model.
Geometry
The obvious core of every model is the geometry, consisting of many polygons, which are always triangles for GTA V. ZModeler 3 allows viewing the geometry in different perspectives and with different options, such as showing the wireframe of the polygons only or showing the textured solid model in different perspectives.
It is possible to create new shapes or to edit and remove parts of the geometry in ZModeler 3 with different tools.
Hierarchy
Seperate model objects are shown in a hierarchy. The parent element is always the name of the model. For cars, the chassis is its only child element, while other items are child objects of the chassis. Some moving objects, such as doors, also have further child objects that will move together with the parent object. For example, a window inside the door object will also move when the door is opened.
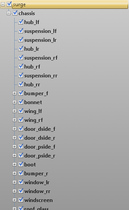
The name of these objects has to follow the naming standards from the default cars to work properly. Additionally, miscellaneous items can be named misc_x, x being any single letter. Every element needs a unique name.
Usually, an object is a so-called compound (explained below in-depth) that includes multiple models (LODs and collisions, see below). Some parts consist of dummies with axes only without having any geometry, for example seat positions.
There is a limit of 128 hierarchy objects (bone limit). This counts every dummy and compound. The number is displayed when exporting from ZModeler.
Compounds
A compound is a collection of multiple models. Compounds will have bold text in the hierachy.
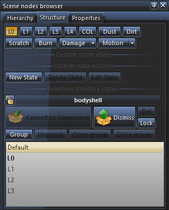
Using the "Structure" tab in the nodes browser, it's possible to view specific sets of models, such as the L0, other LODs or the collision. It's also possible to view specific textures, such as the dirtmap.
To create a compound, select any object (usually a dummy) and click Convert to Compound while the respective structure type is selected (usually no type is selected for Default).
To add items into the compound, first lock the compound to prevent selecting objects you want to move using the Lock icon. Then, select the structure type you want to add (such as COL for the collision model) and drag the object into the grey box.
To remove a compound, simply click the Dismiss button and all items inside will be turned into seperate child objects of the original compound object.
More information about compounds can be found in the ZModeler 3 forum.
LOD
LOD (level of detail) models are different versions of a car that are rendered for specific distances. The L0 is loaded when the car is being driven or right in front of the player in-game, the other LOD models will show up when the car is further away from the player. They are less detailed to improve performance, as many details would not be visible from higher distances.
LOD is explained in-depth in the guide LOD Models.
Collisions
Collision models are very low detail models used to detect collisions of the car in-game. They follow the basic shape of the body.
Materials
Materials are used to provide textures and shaders in-game. Each polygon can be assigned to one material.
Each material has a set shader, such as vehicle_paint for the car's paint, vehicle_tire for wheels or vehicle_mesh for materials such as plastic or metal.
A material contains multiple textures. There is always a diffuse map with the basic colors of a model. Additionally, there may be more textures such as normal maps to create small bumps, specular maps to adjust the shine and reflections of an object, as well environment maps (not visible in-game) and dirtmaps.
The default material is only used for collisions and does not have an assigned shader or textures. If ZModeler shows a Can not obtain Shader material from "Default Material" warning on export, a non-collision object is incorrectly assigned to the default material. To fix this, you must assign the incorrectly assigned polygons to the correct material. To find such polygons, you can use the Select > By material tool while in polygon mode for each LOD.
The order of materials can be changed with drag and drop. It affects transparent materials, for example with glass or emissive shaders, as transparent materials will hide other transparent materials that are covered by them, unless the material of the inner object is higher than the material of the outer object.
We also provide a more in-depth guide regarding the choice of shaders and the setup of materials: Materials and Shaders
More information about materials can be found in the ZModeler 3 forum.
UV Mapping
UV Mapping specifies the position of a polygon on a texture. To view or edit the UV map, use the Surface > Mapping > Edit UV tool on the respective object or selected vertices. Select Keep old mapping to see or modify the current UV map or Generate New to create a new UV map.
UV Maps will be visible in the UV Mapper. In the bottom of the UV mapper, all material(s) assigned to that object are listed and can be selected for editing.
Vertex Paint
Paint is added using the Surface > Paint tools while in vertex mode. The checkbox for Primary Color option in the properties of the object must be active. Vertex paint is used for different purposes depending on the material. For most materials vertex paint is used for the following:
- Red: Ambient Occlusion
Darkens specific vertices. R 255 is the default color, 0 darkens it a lot. It is rarely used on default cars. - Green: Deformation
Sets how much an object can deform in a crash. G 255 for maximum deformation, 0 for no deformation. For default cars, the passenger area is set up not to deform. - Blue: Burnt overlay
Specifies where the burnt texture overlay should be visible on a burnt vehicle. B 255 shows the overlay with full opacity, 0 is no overlay. For default cars, only the passenger area is fully colored, the front and rear fade to no overlay at all.
For some material shaders, paint has different effects:
- vehglass and vehglass_inner: RGB should be set to white, the alpha channel sets whether windows can be tinted, 255 allows tint, 0 does not, values in between should not be used.
- emissive and lightsemissive: RGB colors control the brightness the emissive, full white is default, full black turns the emissive off. Values in between can be used to dim the emissive.
- badges: RGB should be set to white, the alpha channel sets the opacity. 255 is default, 0 is fully transparent.
Exporting
ZModeler 3 saves projects in .z3d files. To be able to use a model in GTA V, it has to be exported in a .yft format. Before exporting, make sure the name of the parent dummy is the same name as the .yft file. After the export, the .yft can simply be renamed, however.
When exporting, the following options can be set:

- Lock: Prevents the car from being imported again by anybody (including you). If you lock your car, make sure you have saved the project file or kept an unlocked copy. This is not 100% safe, in rare cases, people have been able to rip and edit a locked model using external tools.
- Save Thumbnail: Stores a picture of the car visible when importing or trying to import a locked model.
- Comment: A short text shown when importing or trying to import a locked model.
- Skeletal: Activate this option when exporting .yft files (which is always the case for vehicle models), disable this option exporting .ydr files.
- Export LODs: Select the LODs you want to export. Cars for GTA V always have a _hi.yft file for the highest LOD (L0) and a normal .yft file for L1-L4.
When using Autodetect, make sure the parent dummy has to be name_hi, name being the name of the .yft file. Then, when naming the exported file name.yft, it will export L1-L4, when the name is name_hi.yft it will export L0 only.
For further questions or support, please visit our GTA V Support category in the forums.
Authors
-

Cj24
AdministratorAccurate Studio

Participate now!
Don’t have an account yet? Register yourself now and be a part of our community!
Comments 1