

It is not possible to use transparent textures for wheels. Wheels always require the vehicle_tire shader, which does not support transparency.
Posts by Cj24
-
-

In zmod i have my meshes rotated 180 Degrees with pivot off around the dummy, And reset to parent. However, When i go to set them up in LiveLights, The Delta remain at 0, The ENV light shines forward obviously instead of 180.
You will need to set up the delta value yourself, if the model is rotated, the delta needs the corresponding value to point it back to the intended direction. LiveLights allows setting the angle directly instead of the radians like in the meta.
I have my takedowns/Spotlights set to Extralight_3 and set everything to ID 14 in Vertex, Poly, And object, But when i switch to high beams, I lose all evn lighting from headlights, why?
This is simply the way the game works, it will always happen with every car. It is barely noticeable with most default cars as they don't include extralights, but it is obvious with ones that do, such as the RCV.
-
The sirensettings in the carcols need to match the lights you have set up. If you scale your lights to 0.01, you will need a scaleFactor of 100 in your sirensettings. The rotation also has to match. I recommend using LiveLights to modify and export your sirensettings.
Also, please note that we recommend using attachments instead of third party hosters for images.
-
Yes, as the name implies, these materials aren't used by the model at all and therefore can be deleted.
-
The shader type is listed in the material browser. Materials with emissives shaders must be above any glass or badges materials that cover their objects.
-
The order of the extras or their position in the hierarchy has no impact. There are two potential reasons I could think of:
First, the material order might be incorrect after importing, make sure the emissive materials are higher than the glass materials.
Second, the other car may already have other extras with the same name, causing conflicts. In this cases, the affected extras can not be toggled.
-
Hello,
Just to clarify, you mean this trainer? If so, are you using the latest version? It works for me, I can spawn GTA:O weapons and vehicles without any issues.
-
I've finished Pulaski and Hernandez, it's now released.
I'm not sure if the game uses the same textures for the cutscene and in-game models, as the original game didn't. I was only able to find cutscene textures, however I haven't progressed far enough in the story to see the in-game ped versions, so I don't know if this mod affects them as well. If it doesn't, just tell me and I'll try to fix it.
-
I've started experimenting with modding the San Andreas Definitive Edition a bit and decided to fix the Los Santos Police C.R.A.S.H. shoulder patches. In the Remaster they use Metro Division patches instead of the correct CRASH patches. This mod replaces the original clothes textures of Tenpenny, Pulaski and Hernandez, including normal and specular maps.
Credits
Original textures by R*, shoulder patch text modified by Cj24.Terms of Use
You may edit and redistribute this modification provided that correct credits are given.
You may not sell this modification.Installation
Copy the Files\Gameface folder into your GTA:SA Definitive Edition folder.To uninstall this mod, delete the GTA:SA\Gameface\Content\Paks\~mods\LSPDCrashPatches.pak file.
-
Emissive materials must be higher in the material browser than any vehglass material that they are visible through. For interior emissives, this usually means that they should be all the way at the top of the material browser.
-
I have made Code 3 XT4 grill lights and Hide-A-Blast 9 LED hideaways:
This means the light setup is now completed:
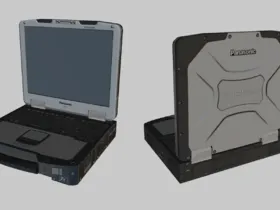
External Content www.youtube.comContent embedded from external sources will not be displayed without your consent.I will work on the interior equipment next. I have already made a Toughbook CF-30, I'm currently working on a console.
-
Please use attachments instead of external hosters, as images hosted on external hosters may become unavailable in the future, potentially load slowly, and those hosters may not respect privacy regulations.
-
The options are only shown in polygon mode or when collisions are selected. Switch to polygon mode, select the model you want to change, select the polygons you want to apply the ID to, then the GTA V Options should appear.
-
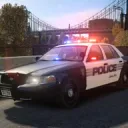
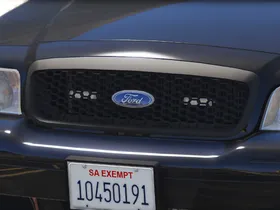
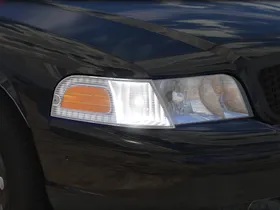
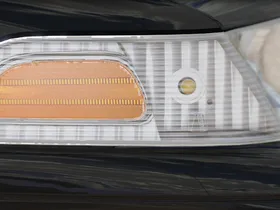
I've put the Ram on hold to work on a 2010 Ford Crown Victoria Police Interceptor, featuring HANAKO's amazing CVPI base.
My current plan is to keep the setup as similar as possible to the Caprice, but with some older equipment, such as XT4 grill lights, a halogen spotlight and Mastercom and ArrowStik controllers. As with the Caprice, I plan to make marked, slicktop and unmarked versions.
-
-
I have added window tint, antennas and interior equipment.
-
Make sure all dummies and axes are in the correct position and all objects are compounded properly.
-
Make sure to choose a comprehensible thread title and describe your issue as precisely as possible.
-
I've recently started working on the LAFD slicktop Chevrolet Caprice with Code 3 Supervisor, Wingman and Side Marker lights. It's a smaller project, with the exception of the Side Marker lights, I already have all the equipment ready. I'll need to add antennas and interior equipment, which will be similar to my LSFD Ram, and start working on the Code 3 Side Marker with the T-Rex modules.
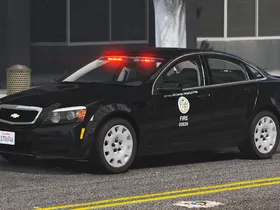
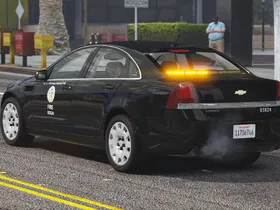
As with all my recent projects, it will be a non-ELS vehicle. Since the LAFD doesn't use light stages, this car won't use any of DLS' features, though DLS will still be supported.
Video of the real car: https://www.youtube.com/watch?v=dxGAJhDIAjg
-
The seat and door layout of a car is set in the vehicles.meta (<layout>...</layout>), the values can be copied from other default cars. However, I'm not sure if there's any default van that supports 6 seats, and I don't know if it's possible to create your own layout.
